Tuesday, December 27, 2022

Routing Border Gateway Protocol (BGP)

Border Gateway Protocol (BGP) merupakan salah satu jenis routing protokol yang digunakan untuk koneksi antar Autonomous System (AS).

Autonomous System (AS) adalah suatu kelompok yang terdiri dari satu atau lebih IP Prefix yang terkoneksi yang dijalankan oleh satu atau lebih operator jaringan dibawah satu kebijakan routing yang didefinisikan dengan jelas. AS diperlukan bila suatu jaringan terhubung ke lebih dari satu AS yang memiliki kebijakan routing yang berbeda. Contoh yang paling sering dijumpai adalah: jaringan yang terhubung kepada dua upstream atau lebih ataupun eXchange Point, peering dengan jaringan lokal pada eXchange Point. Autonomous System Number atau yang disingkat ASN adalah nomor two-byte unik yang diasosiasikan dengan AS. AS Number digunakan sebagai pengidentifikasi yang memungkinkan AS untuk saling menukar informasi routing dinamik dengan AS yang lain. Protokol routing eksterior seperti Border Gateway Protocol (BGP) membutuhkan ASN untuk saling bertukar informasi antara jaringan.

Ada 2 Jenis BGP yaitu (internal BGP) dan eBGP (external BGP)

A. Peering iBGP (internal BGP) adalah hubungan tetangga antar Router BGP yang masih dalam satu AS yang sama. iBGP biasanya dilakukan jika suatu AS memiliki dua atau lebih Router BGP yang berfungsi sebagai pintu masuk dan keluar informasi Routing, dan kemudian antar pintu tersebut atau Router BGP dihubungkan dengan peering agar informasi Routing tersebut dapat melewati AS ini untuk menuju AS berikutnya. 

Dalam iBGP peering terdapat beberapa aturan yaitu :
1. Peering iBGP harus full mesh (jaringan yang saling terhubung bersama dengan perangkat lainnya secara langsung pada satu jaringan) pada antar Router, ini dikarenakan antar Router yang terhubung dengan iBGP tidak dapat meneruskan informasi Routing dari satu iBGP peer pada iBGP peer lainnya, semuanya harus dikirimkan langsung oleh pengirim informasi, dan diterima secara langsung oleh penerimanya. Bisa dibilang informasi Routing yang dikirim tanpa perantara Router lain.
2. Ketika informasi Routing dikirimkan pada antar iBGP Peer, informasi Routing tersebut harus ada dalam Routing table Routing Protocol IGP seperti OSPF, EIGRP, dll. jika tidak maka informasi Routing tersebut tidak akan sampai pada tujuannya. Ini disebut juga dengan Synchronization.
3. Ketika Router BGP menerima informasi dari eBGP kemudian akan diteruskan pada Router yang terhubung dengan iBGP maka atribut-atribut pada informasi Routing tersebut tidak akan diubah, termasuk next-hop atau gateway-nya akan tetap murni yang didapat dari eBGP peer sebelumnya.

Contoh:
CISCO-7200#show ip bgp summary
BGP router identifier 103.43.xxx.xxx, local AS number 133797
BGP table version is 1720968389, main routing table version 1720968389
939100 network entries using 127717600 bytes of memory
1878130 path entries using 105175280 bytes of memory
269734/140326 BGP path/bestpath attribute entries using 34525952 bytes of memory
1 BGP rrinfo entries using 24 bytes of memory
234180 BGP AS-PATH entries using 9805900 bytes of memory
0 BGP route-map cache entries using 0 bytes of memory
0 BGP filter-list cache entries using 0 bytes of memory
BGP using 277224756 total bytes of memory
BGP activity 78910833/77971725 prefixes, 207705411/205827281 paths, scan interval 60 secs

Neighbor          V AS        MsgRcvd   MsgSent  TblVer              InQ OutQ      Up/Down  State/PfxRcd
103.43.xxx.xxx 4 133797 17124812   52260      1720968391     0 0                 4w4d         939100
103.43.xxx.xxx 4 133797 255619112 2563819  1720968391     0 0                 4y11w       939022

B. External BGP (eBGP) adalah hubungan neighbor antar Router BGP dengan AS yang berbeda, sesuai namanya eBGP (external BGP). Pada BGP tidak terdapat fitur Neighbor Discovery atau pencarian neighbor Router secara otomatis, itulah sebabnya sebelum dapat membagikan informasi Routing dengan BGP pertama harus melakukan peering antar Router secara manual.

Peering antar Router BGP yang berbeda AS ini ada beberapa aturan, berikut ini adalah beberapa yang saya ketahui :
1. Peering eBGP tidak perlu full mesh, karena Router BGP dapat meneruskan informasi dari satu Router ke Router lainnya yang berada di AS yang berbeda.
2. Untuk melakukan peering, antar Router yang ingin dihubungkan harus terhubung langsung atau Directly connected, karena secara default paket-paket yang dikirimkan dengan eBGP TTL nya hanya 1.
3. Setiap mengirimkan informasi pada Router yang berbeda AS, maka atribut atribut yang ada pada informasi tersebut akan diubah, tidak seperti iBGP yang tidak diubah atribut-atributnya.

CISCO-ASR-9K-Series#show ip bgp summary
Mon Dec 26 22:42:15.672 WIB
BGP router identifier 114.110.19.138, local AS number 38769
BGP generic scan interval 60 secs
Non-stop routing is enabled
BGP table state: Active
Table ID: 0xe0000000 RD version: 54071786
BGP main routing table version 54071786
BGP NSR Initial initsync version 6 (Reached)
BGP NSR/ISSU Sync-Group versions 0/0
BGP scan interval 60 secs
BGP is operating in STANDALONE mode.
Process RcvTblVer bRIB/RIB LabelVer ImportVer SendTblVer StandbyVer
Speaker 54071786 54071786 54071786 54071786 54071786 0

Some configured eBGP neighbors (under default or non-default vrfs)
do not have both inbound and outbound policies configured for IPv4 Unicast
address family. These neighbors will default to sending and/or
receiving no routes and are marked with '!' in the output below.
Use the 'show bgp neighbor <nbr_address>' command for details.

Neighbor Spk AS MsgRcvd MsgSent TblVer InQ OutQ Up/Down St/PfxRcd
103.116.xxx.xxx 0 137366 5627760 20069 54071786 0 0 1w6d 938718
114.110.xxx.xxx 0 137332 61972 7816159 54071784 0 0 3d07h 0
114.110.xxx.xxx 0 38769 62922 4713531 54071786 0 0 5w0d 8
114.110.xxx.xxx 0 38769 63137 4713531 54071786 0 0 5w0d 16
114.110.xxx.xxx 0 38769 27091551 4713531 54071786 0 0 5w0d 887083
114.110.xxx.xxx 0 65100 61459 6958767 54071548 0 0 5w0d 8
114.110.xxx.xxx 0 64769 63355 6842119 54071654 0 0 5w0d 6
218.100.xxx.xxx 0 7717 228066 55652 54071786 0 0 4d16h 19823

Temukan Artikel lainnya terkait Routing dan Switching di List All Articles Routing & Switching CIENA/CISCO/RAISECOM/BROCADE in This Blog [Updated]

Referensi: dzikrafathintech.blogspot.com

Saturday, December 24, 2022

Penjelasan Commands Yang Dipakai Dalam Konfigurasi OSPF Di CISCO 7200

Dalam postingan saya sebelumnya [Tested] Konfigurasi OSPF Single Area Di Router Cisco 7200 : Test Failed Over Link saya share konfigurasi untuk OSPF di Cisco 7200 tanpa menjelaskan command yang dipakai, di postingan ini saya akan coba share. Semoga bermanfaat

Contoh Konfigurasi:
router ospf 1
 log-adjacency-changes
 passive-interface default
 no passive-interface GigabitEthernet0/0
 no passive-interface GigabitEthernet2/0
 network 10.10.10.0 0.0.0.3 area 0

What is log adjacency changes in OSPF?
Konfigurasi router agar mengirim pesan syslog saat status Neighbor OSPF di Router berubah

Pesan yang akan muncul di Log akan seperti ini jika ada perubahan status OSPF di Router:
*Nov  9 06:59:05.495: %OSPF-5-ADJCHG: Process 1, Nbr 40.40.40.1 on GigabitEthernet0/0 from FULL to DOWN, Neighbor Down: Dead timer expired

Cisco OSPF Passive Interface
Pada saat kita melakukan konfigurasi OSPF pada setiap Router dan memasukan beberapa network, maka interface yang terdapat pada network tersebut akan mengirimkan sebuah paket OSPF yang disebut dengan Hello Packet secara Multicast, tidak hanya Hello Packet tetapi paket paket OSPF lainnya untuk berkomunikasi seperti DBD, LSU, LSR, dan LSAck. semuanya dikirim secara multicast pada alamat IP 224.0.0.5 artinya seluruh perangkat jaringan pada interface Router OSPF tersebut pasti akan mendapatkan kiriman paket-paket OSPF tersebut.
Apa itu Passive Interface? Interface ini adalah interface yang tidak aktif pada OSPF, jadi pada Passive Interface informasi Routing Updates dalam bentuk paket OSPF tidak akan dikirimkan pada Passive Interface, sehingga perangkat pada Passive Interface seperti PC ataupun server tidak akan mendapatkan kiriman paket OSPF.

CISCO-7200#show run interface gigabitEthernet 0/3
Building configuration...
Current configuration : 279 bytes
!
interface GigabitEthernet0/3
 description P2P-RTR-UPS-RTR-CORE 
 ip address 10.10.10.1 255.255.255.252
 no ip redirects
 no ip unreachables
 ip ospf network point-to-point
 duplex auto
 speed auto
 media-type rj45
 negotiation auto
 ipv6 address 2402:3480:3::1/64
end

No ip redirects
Menonaktifkan pesan redirect icmp (pengalihan ping). 
 
No ip Unreachables
Kalo IP-nya diping trus gak reply, tidak adakan muncul "destination host unreachable" tapi muncul "request time out"
 
IP OSPF network point-to-point
Jenis OSPF yang menghubungkan 2 koneksi (atau 2 routers OSPF) yang langsung dan tepat antara 2 perangkat (Point To Point)

Pada OSPF terdapat beberapa jenis area yaitu :
Backbone : Area ini adalah area terpenting pada OSPF, area ini diidentifikasi dengan angka 0 atau 0.0.0.0, fungsi area ini adalah sebagai penghubung antara satu area dengan area lainnya, semua area yang bukan backbone harus terhubung langsung dengan area backbone ini untuk terhubung dengan area lainnya, jika tidak maka area tersebut tidak dapat mengirimkan informasi Routing pada area lain. Area yang tidak terhubung langsung secara fisik dapat diakali dengan menggunakan Virtual-Link.
Standard : Area ini adalah area biasa pada OSPF yang diidentifikasikan dengan angka desimal ataupun dengan 4 oktet angka desimal seperti alamat IP.
Stub : Area ini adalah area yang biasanya berada di ujung topologi OSPF, area ini tidak akan menerima informasi yang berasal dari luar OSPF (Redistribute).

Friday, December 23, 2022

Create & Delete User Name In OLT HUAWEI-MA5608T

CREATE NEW USER With Administrator Privilege:
HUAWEI-MA5608T#terminal user name
User Name(length<6,15>):cia-maintenance
User Password(length<6,15>):

Confirm Password(length<6,15>):
User profile name(<=15 chars)[root]:CIA
Failure: This user-profile does not exist
User profile name(<=15 chars)[root]:root
User's Level:
1. Common User 2. Operator 3. Administrator:3
Permitted Reenter Number(0--4):4
User's Appended Info(<=30 chars):CIA
Adding user successfully
Repeat this operation? (y/n)[n]:n

BEFORE:
HUAWEI-MA5608T>display terminal user all
----------------------------------------------------------------------------
Name                  Level     Status     Reenter      Profile    Append
                                                        Num Info
----------------------------------------------------------------------------
root                     Super     Online   1                  root        ----- 
----------------------------------------------------------------------------
Total record(s) number: 1

AFTER:

HUAWEI-MA5608T>display terminal user all
----------------------------------------------------------------------------
Name                  Level     Status      Reenter      Profile    Append
                                                         Num Info
----------------------------------------------------------------------------
root                     Super     Online    1                  root        -----  

cia-maintenance   Admin   Online    4                  root       CIA
----------------------------------------------------------------------------
Total record(s) number:2


DELETE USER

HUAWEI-MA5608T#undo terminal user name
User Name(<=15 chars):cia-maintenance
Are you sure to delete the user?(y/n)[n]:y
Deleting user successfully
Repeat this operation? (y/n)[n]:n

Temukan Artikel lainnya tentang GPON OLT dan FTTH di --> List All Articles About GPON OLT Huawei - ZTE - Alcatel Lucent in This Blog [Updated]


Wednesday, November 09, 2022

[Tested] Konfigurasi OSPF Single Area Di Router Cisco 7200 : Test Failed Over Link

Ini hanya sekedar sharing, soalnya daripada Youtube-an terus ... nulis di Blog kayanya lebih bermanfaat :D

#####
OSPF kepanjangan dari Open Shothest Path First adalah salah satu Routing protokol pada kebanyakan Router yang berfungsi untuk mendistribusikan informasi jaringan dari satu Router ke Router lainnya. Dengan menggunakan OSPF pada jaringan kita dapat mengaktifkan dynamic routing sehingga dalam konfigurasi routing tidak seribet Static Routing.

OSPF merupakan protokol IGP (Interior Gateway routing Protocol) yang artinya OSPF hanya dapat mendistribusikan informasi Routing dalam satu AS yang sama saja, setiap informasi routing dalam OSPF disebut dengan LSA (Link State Advertisement), sekumpulan LSA tersebut disimpan dalam LSDB (Link State Database) setiap Router.

Tools yang saya gunakan:
1. Aplikasi GNS3 (Karena Lebih Real Ketimbang Packet Tracert)
2. Cisco Router 7200
Cisco IOS Software, 7200 Software (C7200-ADVENTERPRISEK9-M)
Version 12.4(24)T5
3. Cisco 3600 (L3 & L2)
Cisco IOS Software, 3600 Software (C3660-A3JK9S-M)
This is a normal Router with a SW module inside (NM-16ESW)
Version 12.4(25d)

Topology yang saya buat, ada 4 Buah Router Cisco 7200 dan Switch L2-L3 Cisco 3600 untuk Test failed over Link

Konfigurasi di 4 Router Cisco 7200

Konfigurasi di Router 1 Cisco 7200
R1-Cisco7200#
interface GigabitEthernet0/0
 description TO-R2
 ip address 10.10.10.1 255.255.255.252
 no ip redirects
 no ip unreachables
 ip ospf network point-to-point
 duplex auto
 speed auto
 media-type rj45
!
interface GigabitEthernet1/0
 description TO-L2-A
 no ip address
 negotiation auto
!
interface GigabitEthernet1/0.100
 description VLAN-100
 encapsulation dot1Q 100
 ip address 192.168.100.1 255.255.255.0
!
interface GigabitEthernet2/0
 description TO-R4
 ip address 30.30.30.1 255.255.255.252
 no ip redirects
 no ip unreachables
 ip ospf network point-to-point
 negotiation auto
!
router ospf 1
 log-adjacency-changes
 passive-interface default
 no passive-interface GigabitEthernet0/0
 no passive-interface GigabitEthernet2/0
 network 10.10.10.0 0.0.0.3 area 0
 network 30.30.30.0 0.0.0.3 area 0
 network 192.168.100.0 0.0.0.3 area 0
 network 192.168.200.0 0.0.0.3 area 0

R1-Cisco7200#show interfaces description
Interface                      Status         Protocol Description
Et0/0                          admin down     down
Gi0/0                          up             up       TO-R2
Gi1/0                          up             up       TO-L2-A
Gi1/0.100                      up             up       VLAN-100
Gi2/0                          up             up       TO-R4

R1-Cisco7200#show ip interface brief
Interface                  IP-Address      OK? Method Status                Protocol
Ethernet0/0                unassigned      YES NVRAM  administratively down down
GigabitEthernet0/0         10.10.10.1      YES NVRAM  up                    up
GigabitEthernet1/0         unassigned      YES NVRAM  up                    up
GigabitEthernet1/0.100     192.168.100.1   YES NVRAM  up                    up
GigabitEthernet2/0         30.30.30.1      YES NVRAM  up                    up

Cek Status OSFP-nya apakah Full atau tidak
R1-Cisco7200#show ip ospf neighbor
Neighbor ID     Pri   State           Dead Time   Address         Interface
50.50.50.2        0   FULL/  -        00:00:34    30.30.30.2      GigabitEthernet2/0
40.40.40.1        0   FULL/  -        00:00:39    10.10.10.2      GigabitEthernet0/0

Konfigurasi di Router 2 Cisco 7200
R2-Cisco7200#
interface GigabitEthernet0/0
 description TO-R1
 ip address 10.10.10.2 255.255.255.252
 no ip redirects
 no ip unreachables
 ip ospf network point-to-point
 duplex auto
 speed auto
 media-type rj45
!
interface GigabitEthernet1/0
 description TO-R4
 ip address 40.40.40.1 255.255.255.252
 no ip redirects
 no ip unreachables
 ip ospf network point-to-point
 negotiation auto
!
interface GigabitEthernet2/0
 description TO-R3
 ip address 20.20.20.1 255.255.255.252
 no ip redirects
 no ip unreachables
 ip ospf network point-to-point
 negotiation auto
!
router ospf 1
 log-adjacency-changes
 passive-interface default
 no passive-interface GigabitEthernet0/0
 no passive-interface GigabitEthernet1/0
 no passive-interface GigabitEthernet2/0
 network 10.10.10.0 0.0.0.3 area 0
 network 20.20.20.0 0.0.0.3 area 0
 network 40.40.40.0 0.0.0.3 area 0
!

R2-Cisco7200#show interfaces description
Interface                      Status         Protocol Description
Et0/0                          admin down     down
Gi0/0                          up             up       TO-R1
Gi1/0                          up             up       TO-R4
Gi2/0                          up             up       TO-R3

R2-Cisco7200#show ip interface brief
Interface                  IP-Address      OK? Method Status                Protocol
Ethernet0/0                unassigned      YES NVRAM  administratively down down
GigabitEthernet0/0         10.10.10.2      YES NVRAM  up                    up
GigabitEthernet1/0         40.40.40.1      YES NVRAM  up                    up
GigabitEthernet2/0         20.20.20.1      YES NVRAM  up                    up

Cek Status OSFP-nya apakah Full atau tidak
R2-Cisco7200#show ip ospf neighbor
Neighbor ID     Pri   State           Dead Time   Address         Interface
50.50.50.2        0   FULL/  -        00:00:37    40.40.40.2      GigabitEthernet1/0
192.168.200.1     0   FULL/  -        00:00:38    20.20.20.2      GigabitEthernet2/0
192.168.100.1     0   FULL/  -        00:00:37    10.10.10.1      GigabitEthernet0/0

Konfigurasi di Router 3 Cisco 7200
R3-Cisco7200#
interface GigabitEthernet0/0
 description TO-R2
 ip address 20.20.20.2 255.255.255.252
 ip ospf network point-to-point
 duplex full
 speed 1000
 media-type gbic
 negotiation auto
!
interface GigabitEthernet1/0
 description TO-R4
 ip address 50.50.50.1 255.255.255.252
 no ip redirects
 no ip unreachables
 ip ospf network point-to-point
 negotiation auto
!
interface GigabitEthernet2/0
 description TO-L2-B
 no ip address
 no ip redirects
 no ip unreachables
 negotiation auto
!
interface GigabitEthernet2/0.200
 description VLAN-200
 encapsulation dot1Q 200
 ip address 192.168.200.1 255.255.255.0
 no ip unreachables
!
router ospf 1
 log-adjacency-changes
 passive-interface default
 no passive-interface GigabitEthernet0/0
 no passive-interface GigabitEthernet1/0
 network 20.20.20.0 0.0.0.3 area 0
 network 50.50.50.0 0.0.0.3 area 0
 network 192.168.100.0 0.0.0.3 area 0
 network 192.168.200.0 0.0.0.3 area 0

R3-Cisco7200#show interfaces description
Interface                      Status         Protocol Description
Et0/0                          admin down     down
Gi0/0                          up             up       TO-R2
Gi1/0                          up             up       TO-R4
Gi2/0                          up             up       TO-L2-B
Gi2/0.200                      up             up       VLAN-200

R3-Cisco7200#show ip interface brief
Interface                  IP-Address      OK? Method Status                Protocol
Ethernet0/0                unassigned      YES NVRAM  administratively down down
GigabitEthernet0/0         20.20.20.2      YES NVRAM  up                    up
GigabitEthernet1/0         50.50.50.1      YES NVRAM  up                    up
GigabitEthernet2/0         unassigned      YES NVRAM  up                    up
GigabitEthernet2/0.200     192.168.200.1   YES NVRAM  up                    up

Cek Status OSFP-nya apakah Full atau tidak
R3-Cisco7200#show ip ospf neighbor
Neighbor ID     Pri   State           Dead Time   Address         Interface
50.50.50.2        0   FULL/  -        00:00:30    50.50.50.2      GigabitEthernet1/0
40.40.40.1        0   FULL/  -        00:00:31    20.20.20.1      GigabitEthernet0/0

Konfigurasi di Router 4 Cisco 7200
R4-Cisco7200#
interface GigabitEthernet0/0
 description TO-R2
 ip address 40.40.40.2 255.255.255.252
 no ip redirects
 no ip unreachables
 ip ospf network point-to-point
 duplex full
 speed 1000
 media-type gbic
 negotiation auto
!
interface GigabitEthernet1/0
 description TO-R3
 ip address 50.50.50.2 255.255.255.252
 no ip redirects
 no ip unreachables
 ip ospf network point-to-point
 negotiation auto
!
interface GigabitEthernet2/0
 description TO-R1
 ip address 30.30.30.2 255.255.255.252
 no ip redirects
 no ip unreachables
 ip ospf network point-to-point
 negotiation auto
!
router ospf 1
 log-adjacency-changes
 passive-interface default
 no passive-interface GigabitEthernet0/0
 no passive-interface GigabitEthernet1/0
 no passive-interface GigabitEthernet2/0
 network 30.30.30.0 0.0.0.3 area 0
 network 40.40.40.0 0.0.0.3 area 0
 network 50.50.50.0 0.0.0.3 area 0
!

R4-Cisco7200#show interfaces description
Interface                      Status         Protocol Description
Et0/0                          admin down     down
Gi0/0                          up             up       TO-R2
Gi1/0                          up             up       TO-R3
Gi2/0                          up             up       TO-R1

R4-Cisco7200#show ip interface brief
Interface                  IP-Address      OK? Method Status                Protocol
Ethernet0/0                unassigned      YES NVRAM  administratively down down
GigabitEthernet0/0         40.40.40.2      YES NVRAM  up                    up
GigabitEthernet1/0         50.50.50.2      YES NVRAM  up                    up
GigabitEthernet2/0         30.30.30.2      YES NVRAM  up                    up

Cek Status OSFP-nya apakah Full atau tidak
R4-Cisco7200#show ip ospf neighbor
Neighbor ID     Pri   State           Dead Time   Address         Interface
192.168.200.1     0   FULL/  -        00:00:35    50.50.50.1      GigabitEthernet1/0
40.40.40.1        0   FULL/  -        00:00:31    40.40.40.1      GigabitEthernet0/0
192.168.100.1     0   FULL/  -        00:00:39    30.30.30.1      GigabitEthernet2/0


Konfigurasi disisi Switch L2-L3 Cisco 3600 Untuk Test Link dengan IP Address:
Cisco3600-L2-A#show run interface vlan 100
Building configuration...
Current configuration : 65 bytes
!
interface Vlan100
 ip address 192.168.100.3 255.255.255.0
end

Cisco3600-L2-B#show run interface vlan 200
Building configuration...
Current configuration : 65 bytes
!
interface Vlan200
 ip address 192.168.200.3 255.255.255.0
end

Pengetesan di Switch dengan Traceroute yang telah dipasang Interface VLAN-100 dan Interface VLAN-200 dengan Semua Link UP

Pengetesan di Switch dengan Traceroute yang telah dipasang Interface VLAN-100 dan Interface VLAN-200 dengan Test Failed Over Link (Link ada yang down) dimana Hop yang dilewati hanya 2

Cisco3600-L2-A#traceroute 192.168.200.3 (Traceroute dari Router-1 ke arah Router-3 yang beda IP Network dan Vlan) 
Type escape sequence to abort.
Tracing the route to 192.168.200.3
  1 192.168.100.1 16 msec 20 msec 12 msec
  2 10.10.10.2 44 msec 28 msec 32 msec
  3 20.20.20.2 52 msec 40 msec 40 msec
  4 192.168.200.3 56 msec 56 msec 52 msec

Cisco3600-L2-B#traceroute 192.168.100.3
Type escape sequence to abort.
Tracing the route to 192.168.100.3
  1 192.168.200.1 4 msec 8 msec 12 msec
  2 20.20.20.1 20 msec 24 msec 28 msec
  3 10.10.10.1 40 msec 40 msec 48 msec
  4 192.168.100.3 52 msec 52 msec 48 msec
Pengetesan di Switch dengan Traceroute yang telah dipasang Interface VLAN-100 dan Interface VLAN-200 dengan Test Failed Over Link (Link ada yang down) dimana Hop yang dilewati menjadi 3

Dari Log yang ada ketika Link putus di Router 1 log-nya seperti ini:
R1-Cisco7200#
*Nov  9 06:59:05.495: %OSPF-5-ADJCHG: Process 1, Nbr 40.40.40.1 on GigabitEthernet0/0 from FULL to DOWN, Neighbor Down: Dead timer expired

Status OSPF Yang Up hanya 1 sekarang (sebelumnya 2)
R1-Cisco7200#show ip ospf neighbor
Neighbor ID     Pri   State           Dead Time   Address         Interface
50.50.50.2        0   FULL/  -        00:00:32    30.30.30.2      GigabitEthernet2/0

Cisco3600-L2-A#traceroute 192.168.200.3
Type escape sequence to abort.
Tracing the route to 192.168.200.3
  1 192.168.100.1 12 msec 8 msec 12 msec
  2 30.30.30.2 28 msec 32 msec 28 msec
  3 40.40.40.1 52 msec 40 msec 40 msec
  4 20.20.20.2 48 msec 52 msec 48 msec
  5 192.168.200.3 100 msec 72 msec 60 msec

Dari Log yang ada ketika Link putus di Router 3 log-nya seperti ini:
R3-Cisco7200#
*Nov  9 06:59:01.611: %OSPF-5-ADJCHG: Process 1, Nbr 50.50.50.2 on GigabitEthernet1/0 from FULL to DOWN, Neighbor Down: Dead timer expired

Status OSPF Yang Up hanya 1 sekarang (sebelumnya 2)
R3-Cisco7200#show ip ospf neighbor
Neighbor ID     Pri   State           Dead Time   Address         Interface
40.40.40.1        0   FULL/  -        00:00:35    20.20.20.1      GigabitEthernet0/0

Traceroute menjadi 3 Hop
Cisco3600-L2-B#traceroute 192.168.100.3
Type escape sequence to abort.
Tracing the route to 192.168.100.3
  1 192.168.200.1 12 msec 8 msec 12 msec
  2 20.20.20.1 20 msec 20 msec 24 msec
  3 40.40.40.2 48 msec 32 msec 28 msec
  4 30.30.30.1 56 msec 40 msec 40 msec
  5 192.168.100.3 60 msec 60 msec 64 msec

Temukan Artikel lainnya terkait Routing dan Switching di List All Articles Routing & Switching CIENA/CISCO/RAISECOM/BROCADE in This Blog [Updated]

Sunday, November 06, 2022

OSPF Problem Gak Mau FULL: Neighbor Down: Too many retransmissions

Dah berbulan-bulan gak Update Blog ... kita isi yah ^_^

#####
Ada kasus dimana OSPF di CISCO ASR903 dengan IOS-XE OSPF-nya gak mau FULL dan ini baru diketahui ketika Link Utama Down, Link Backup gak otomatis UP karena OSPF-nya problem

JKT-ASR903-1#show ip ospf neighbor
Neighbor ID Pri  State              Dead Time  Address       Interface
10.48.1.168  0     EXSTART/ - 00:00:38     10.49.4.57   TenGigabitEthernet0/0/2

Dari Log yang ada di JKT-ASR903-1 didapatkan seperti ini:
*Nov 5 15:00:01.676: %OSPF-5-ADJCHG: Process 1, Nbr 10.48.1.168 on TenGigabitEthernet0/0/2 from EXSTART to DOWN, Neighbor Down: Too many retransmissions
*Nov 5 15:01:01.674: %OSPF-5-ADJCHG: Process 1, Nbr 10.48.1.168 on TenGigabitEthernet0/0/2 from DOWN to DOWN, Neighbor Down: Ignore timer expired


Padahal OSPF di Interface CISCO ASR903 sudah diset MTU yang sama dengan Interface di perangkat lawannya yaitu Brocade CES yaitu 9126 tapi masih belum FULL juga (why ???)

Ternyata di Perangkat lawannya yang berbeda Merk yaitu Brocade CES ada settingan "ip global-mtu 9198" jadi walaupun di Interface diset MTU 9216 namun settingan Global-MTU di Brocade CES 9198 "mengalahkan" settingan MTU di Interface-nya

Sebelumnya saya coba delete dan create lagi MTU di Interface-nya trus juga nambahin "ip ospf mtu-ignore" sesuai hasil googling, ternyata gak ngaruh. yang berhasil adalah menambahkan ip mtu 9198 di Interface-nya. jadi di interface ada mtu 9216 dan ip mtu 9198

JKT-ASR903-1#show run interface tenGigabitEthernet 0/0/2
Building configuration...
Current configuration : 337 bytes
!
interface TenGigabitEthernet0/0/2
description TO-JKT-CES-2
mtu 9216
ip address 10.49.4.58 255.255.255.252
ip mtu 9198
ip ospf network point-to-point
ip ospf bfd
ip ospf 1 area 0
load-interval 30
carrier-delay up msec 10
mpls ip
mpls traffic-eng tunnels
ip rsvp bandwidth
ip rsvp signalling hello graceful-restart
end

JKT-ASR903-1#show ip ospf neighbor
Neighbor ID Pri  State              Dead Time  Address       Interface
10.48.1.168  0     FULL/ -        00:00:38     10.49.4.57   TenGigabitEthernet0/0/2

Thursday, August 18, 2022

Popular Software Tools For Network Engineers

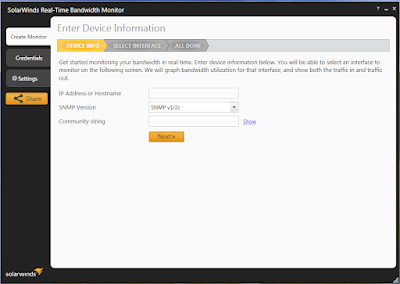
 1. Solarwind Realtime Bandwith Monitoring 

2. IP Scanner 

3. Advanced Port Scanner 
For Scanning Available Port IP Address

4. Xshell 7.0
The Best For Remote CLI 

5. SecureCRT 
Second Best for Remote CLI

6. Notepad++ 
For Multitab Notepad and check Text Configuration 

7. Search Everyting 

8. WinMerge 

For Checking and Comparing Text Configuration


9. Realtek Ethernet Diagnostic Utility 
For Making Vlan Trunking on Laptop 

10. Solarwind TFTP Server 

11. TFGen

Bandwith Test (Bertest) 

12. Netpersec 

Bandwith Monitoring for Bandwith Test (Bertest) 

13. Visual Ping

Fast Simultaneous Ping

14. Inssider 

Wednesday, May 04, 2022

Config New ONT ZTE di OLT GPON NOKIA (isam-release : R5.6.02c) : Mode QinQ Vlan Translation

leg:isadmin>#configure qos profiles bandwidth DOWN-33M committed-info-rate 0 assured-info-rate 0 excessive-info-rate 33000
leg:isadmin>#configure qos profiles shaper DOWN-33M committed-info-rate 0 committed-burst-size 0 excess-info-rate 33000 type singletokenbucketgpon
leg:isadmin>#configure qos profiles bandwidth UP-33M committed-info-rate 0 assured-info-rate 0 excessive-info-rate 33000 

leg:isadmin>#configure equipment ont interface 1/1/1/2/10 sernum ZTEG:C11948FD sw-ver-pland disabled (SN ONT ZTE dipisah dengan ":")
leg:isadmin>#configure>equipment>ont>interface>1/1/1/2/10$ desc1 Internet_Dedicated_30Mbps
leg:isadmin>#configure>equipment>ont>interface>1/1/1/2/10$ admin-state up
leg:isadmin>#configure equipment ont slot 1/1/1/2/10/1 plndnumdataports 4 plndnumvoiceports 0 planned-card-type ethernet
leg:isadmin>#configure interface port uni:1/1/1/2/10/1/1 admin-up (Port yang UP Port 1)
leg:isadmin>#configure qos interface 1/1/1/2/10/1/1 upstream-queue 0
leg:isadmin>#configure qos interface 1/1/1/2/10/1/1 queue 0 shaper-profile name:DOWN-33M
leg:isadmin>#configure qos interface 1/1/1/2/10/1/1 upstream-queue 0 bandwidth-profile name:UP-33M

leg:isadmin>#configure vlan id stacked:1402:1031 mode residential-bridge
leg:isadmin>#configure>vlan>id>1031$ in-qos-prof-name name:Default_TC0

leg:isadmin>#configure bridge port nt:xfp:1 vlan-id stacked:1402:1031 (Tag vlan ke arah Port Uplink)
leg:isadmin>#configure bridge port 1/1/1/2/10/1/1 max-unicast-mac 100
leg:isadmin>#configure bridge port 1/1/1/2/10/1/1 vlan-id 1031 tag single-tagged l2fwder-vlan stacked:1402:1031 vlan-scope local (Tag vlan ke arah ont port 1)
leg:isadmin>#configure bridge port 1/1/1/2/10/1/1 pvid 1031

configure interface port vlan-port:1/1/1/2/10/1/1:1031
leg:isadmin>#configure>interface>port>vlan-port:1/1/1/2/10/1/1:1031# admin-up 

configure qos interface vlan:1/1/1/2/10/1/1:1031

Temukan Artikel lainnya tentang GPON OLT dan FTTH di --> List All Articles About GPON OLT Huawei - ZTE - Alcatel Lucent in This Blog [Updated]

Tuesday, March 29, 2022

Basic Linux Commands (Centos 6/7)

System Information

Show Centos Version
cat /etc/centos-release

Show computer architecture:
arch

Show kernel version
uname -r

Show system date
date

Show calendar table for 2014
cal 2014

Files and Directories

Go to '/var/www/'
cd /var/www

Go to the upper level directory
cd ..

Go to home directory
cd ~

Go to home directory of “user”
cd ~user

Show the contents of the current directory
ls

Show the contents of the current directory adding characters to the names characterizing the type
ls -F

Show detailed representation of files and directories in the current directory
ls -l

Show hidden files and directories in the current directory
ls -a

Create a directory called ‘test’
mkdir test

Create two directories simultaneously
mkdir test1 test2

Create a directory tree
mkdir -p /var/www/test/dir

Delete the file named ‘file’
rm -f file

Delete a directory named ‘dir’
rmdir dir

Delete a directory named ‘dir’ and all of its contents recursively
rm -rf dir

Rename or move a file or directory
mv dir1 new_dir

Copy file1 in file2
cp file1 file2

Create a symbolic link to a file or directory
ln -s file1 file2

Searching Files

Find files and directories named file1. Start searching from the root (/)
find / -name file1

Find files and directories owned by user1. Start searching from the root (/)
find / -user user1

Find all files and directories whose names end in ‘.log’. Start searching from ‘/var/www’
find /var/www -name "*.log"

Find all files containing '.png' in the name. it is recommended to run 'updatedb' command before this.
locate "*.png"

Find all files with '.log' extension in the current directory, including subdirectories and delete them
find . -name '*.log' -type f -delete

Disk Space

Information about partitioned sections displaying total, free and used space
df -h

Show the size used by directory ‘dir1’
du -sh dir1

Users and Groups

Create user1, assign /home/user1 as its home directory, assign /bin/bash as a shell, include it in ‘admin’ group and add a comment Nome Cognome
useradd -c "Nome Cognome" -g admin -d /home/user1 -s /bin/bash user1

Create user1
useradd user1

Delete user1 and its home directory
userdel -r user1

Create a new group named group_name
groupadd group_name

Delete group group_name
groupdel group_name

Rename group old_group_name in new_group_name
groupmod -n new_group_name old_group_name

Change password
passwd

Change password of user1 (only root)
passwd user1

Setting/Changing File Rights

Add rights 777 (Read Write Execute) to directory1 – full rights to everybody.
chmod 777 directory1

Add rights to directory1, including all files and subfolders in it, rights 777 (Read Write Execute) - full rights to everybody.
chmod –R 777 directory1

Assign user1 as the owner of file1
chown user1 file1

Recursively assign user1 as the owner of directory1
chown -R user1 directory1

Assign user 'apache' from the group 'apache' to folder 'dir', including all subfolders and files:
chown apache:apache -R /var/www/dir

Find all files in the current directory, including subfolders and assign rights 664
find . -type f -printf "\"%p\" " | xargs chmod 664

Find all folders in the current directory, including subfolders and assign rights 775
find . -type d -printf "\"%p\" " | xargs chmod 775

File Archiving and Compression

Unarchive file 'file1.bz2'
bunzip2 file1.bz2

Unarchive file 'file1.gz'
gunzip file1.gz

Archive file 'file1' to file1.gz
gzip file1

Archive file file1 to file1.bz2
bzip2 file1

Create an archive and zip it with gzip
tar -cvfz archive.tar.gz dir1

Unarchive and extract
tar -xvfz archive.tar.gz

Create zip-archive
zip file1.zip file1

Unarchive and extract zip-archive
unzip file1.zip

Upgrading Packages

Upload and install package
yum install package_name

Update all packages installed in the system
yum update

Update package
yum update package_name

Delete package
yum remove package_name

Show the list of all packages installed in the system
yum list

Find a package in the repository
yum search package_name

Clean rpm-cache, deleting uploaded packages
yum clean packages

Clean rpm-cache, deleting uploaded packages and headers
yum clean all

Source: https://serverdale.com/en/linux-commands

Thursday, March 17, 2022

Install & Replace ONT Huawei di OLT Nokia (isam-release : R5.6.02c) : Mode Port Access & Trunk

QOS
leg:JKT-OLT-ALU-NOKIA:user>#configure qos profiles bandwidth DOWN-4M committed-info-rate 0 assured-info-rate 0 excessive-info-rate 4096
leg:JKT-OLT-ALU-NOKIA:user>#configure qos profiles shaper DOWN-4M committed-info-rate 0 committed-burst-size 0 excess-info-rate 4096 type singletokenbucketgpon
leg:JKT-OLT-ALU-NOKIA:user>#configure qos profiles bandwidth UP-4M committed-info-rate 0 assured-info-rate 0 excessive-info-rate 4096

To Change ONT and Install New ONT, We Must Delete Old ONT
leg:JKT-OLT-ALU-NOKIA:user>#configure equipment ont interface 1/1/1/1/6 admin-state down (ONT harus dishutdown dulu sebelum didelete)
leg:JKT-OLT-ALU-NOKIA:user>#configure equipment ont no interface 1/1/1/1/6

Register New ONT
leg:JKT-OLT-ALU-NOKIA:user>#configure equipment ont interface 1/1/1/1/6 sernum HWTC:B43A0273 sw-ver-pland disabled (Gunakan ":" untuk memisahkan SN ONT Huawei)
leg:JKT-OLT-ALU-NOKIA:user>configure>equipment>ont>interface>1/1/1/1/6$desc1 "ATM Bank Banyak Duit"
leg:JKT-OLT-ALU-NOKIA:user>#configure equipment ont interface 1/1/1/1/6 admin-state up
leg:JKT-OLT-ALU-NOKIA:user>#configure equipment ont slot 1/1/1/1/6/1 plndnumdataports 4 plndnumvoiceports 0 planned-card-type ethernet
leg:JKT-OLT-ALU-NOKIA:user>#configure interface port uni:1/1/1/1/6/1/1 admin-up
leg:JKT-OLT-ALU-NOKIA:user>#configure qos interface 1/1/1/1/6/1/1 upstream-queue 0
leg:JKT-OLT-ALU-NOKIA:user>#configure qos interface 1/1/1/1/6/1/1 queue 0 shaper-profile name:DOWN-4M
leg:JKT-OLT-ALU-NOKIA:user>#configure qos interface 1/1/1/1/6/1/1 upstream-queue 0 bandwidth-profile name:UP-4M

leg:JKT-OLT-ALU-NOKIA:user>#configure vlan id 1573 mode residential-bridge
leg:JKT-OLT-ALU-NOKIA:user>#configure>vlan>id>1573$ in-qos-prof-name name:Default_TC0

leg:JKT-OLT-ALU-NOKIA:user>#configure bridge port 1/1/1/1/6/1/1 max-unicast-mac 100
leg:JKT-OLT-ALU-NOKIA:user>#configure bridge port 1/1/1/1/6/1/1 vlan-id 1573 (untuk Access) 
leg:JKT-OLT-ALU-NOKIA:user>#configure bridge port 1/1/1/1/6/1/1 vlan-id 1573 tag single-tagged  (Untuk Trunk)
leg:JKT-OLT-ALU-NOKIA:user>#configure bridge port 1/1/1/1/6/1/1 pvid 1573

leg:JKT-OLT-ALU-NOKIA:user>#configure bridge port nt:xfp:1 vlan-id 1573 (Config ke arah Port Uplink)
leg:JKT-OLT-ALU-NOKIA:user>#configure interface port vlan-port:1/1/1/1/6/1/1:1573 (Config di ONT Port 1)
leg:isadmin>#configure>interface>port>vlan-port:1/1/1/1/6/1/1:1573# admin-up 

leg:JKT-OLT-ALU-NOKIA:user>#configure qos interface vlan:1/1/1/6/1/1/1:1031

Temukan Artikel lainnya tentang GPON OLT dan FTTH di --> List All Articles About GPON OLT Huawei - ZTE - Alcatel Lucent in This Blog [Updated]

Sunday, February 06, 2022

CLI Command Switch L2 Juniper EX2300

Check Version
user@Juniper-Ex2300>show version
Hostname: Juniper-Ex2300
Model: ex2300-24t-dc
Junos: 18.1R3.3

Clock, Date and Uptime
user@Juniper-Ex2300>show system uptime 

Show User
user@Juniper-Ex2300>show system users 

Show run
user@Juniper-Ex2300>show configuration 

Show log
user@Juniper-Ex2300>show log messages | last/match/find ...

Check Status Interface
user@Juniper-Ex2300>show interfaces terse 
Interface Admin Link Proto Local Remote
ge-0/0/0 up up
ge-0/0/0.225 up up eth-switch
pfe-0/0/0 up up
pfh-0/0/0 up up
pfh-0/0/0.16384 up up inet
ge-0/0/1 up down
xe-0/1/3 up up
xe-0/1/3.1054 up up eth-switch

user@Juniper-Ex2300>show interfaces brief | last/match/find ...

user@Juniper-Ex2300>show interfaces brief | match Physical
Physical interface: ge-0/0/0, Enabled, Physical link is Up
Physical interface: pfe-0/0/0, Enabled, Physical link is Up
Physical interface: pfh-0/0/0, Enabled, Physical link is Up
Physical interface: ge-0/0/1, Enabled, Physical link is Down

Check Port Configuration
user@Juniper-Ex2300>show configuration interfaces ge-0/0/1
flexible-vlan-tagging;
native-vlan-id 2;
encapsulation extended-vlan-bridge;
unit 154 {
vlan-id-list 2-4094;
input-vlan-map push;
output-vlan-map pop;
}
{master:0}

Check Optical Value
user@Juniper-Ex2300>show interfaces diagnostics optics xe-0/1/3 | match dBm
Laser output power : 0.6920 mW / -1.60 dBm
Laser receiver power : 0.2847 mW / -5.46 dBm
Laser output power high alarm threshold : 1.4120 mW / 1.50 dBm
Laser output power low alarm threshold : 0.1770 mW / -7.52 dBm
Laser output power high warning threshold : 1.2580 mW / 1.00 dBm
Laser output power low warning threshold : 0.1990 mW / -7.01 dBm
Laser rx power high alarm threshold : 1.0000 mW / 0.00 dBm
Laser rx power low alarm threshold : 0.0251 mW / -16.00 dBm
Laser rx power high warning threshold : 0.7943 mW / -1.00 dBm
Laser rx power low warning threshold : 0.0315 mW / -15.02 dBm

Check SN and Hardware Installed (SFP)
user@Juniper-Ex2300>show chassis hardware
Hardware inventory:
Item Version Part number Serial number Description
Chassis LZ0219390388 EX2300-24T-DC
Pseudo CB 0
Routing Engine 0 BUILTIN BUILTIN RE-EX2300-24T-DC
FPC 0 REV 18 650-060509 LZ0219390388 EX2300-24T-DC
CPU BUILTIN BUILTIN FPC CPU
PIC 0 REV 18 BUILTIN BUILTIN 24x10/100/1000 Base-T
PIC 1 REV 18 650-060509 LZ0219390388 4x10G SFP/SFP+
Xcvr 0 NON-JNPR 2001060035 SFP-LX10
Xcvr 3 NON-JNPR 00101S19218U0074 SFP+-10G-LR

Power Supply 0 JPSU-100W-DC-AFO
Fan Tray 0 Fan Module, Airflow Out (AFO)

Show Mac Address
user@Juniper-Ex2300>show ethernet-switching table brief 

IP OAM Logical Interface
*irb = Integrated Routing and Bridging)*
user@Juniper-Ex2300>show configuration interfaces irb
unit 0 {
family inet {
dhcp {
vendor-id Juniper-ex2300-24t-dc-LZ0219390388;
}
}
}
unit 1054 {
family inet {
address 10.54.101.1/29;
}
}

Static Route for Gateway IP Interface
user@Juniper-Ex2300>show configuration routing-options
static {
route 0.0.0.0/0 next-hop 10.54.101.3;
}
{master:0}

Entering Config Mode
user@Juniper-Ex2300>configure
user@Juniper-Ex2300#

Out From Config Mode
bit@Juniper-Ex2300# exit
bit@Juniper-Ex2300>

Shut-No Shut Interface
user@Juniper-Ex2300>configure
user@Juniper-Ex2300#set interfaces ge-0/0/10 disable
user@Juniper-Ex2300#set interfaces ge-0/0/10 enable

Edit Interface
user@Juniper-Ex2300>configure
user@Juniper-Ex2300#edit interfaces ge-0/0/10